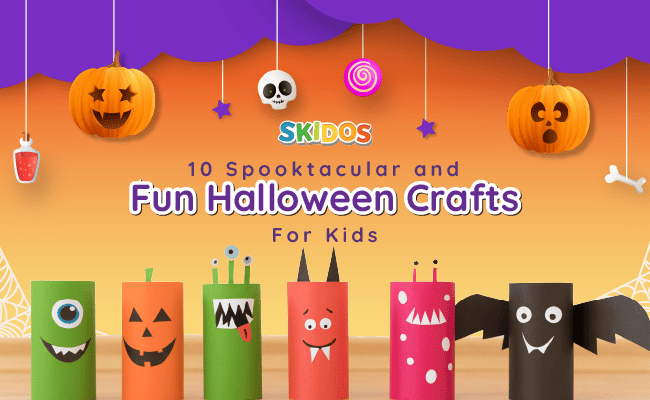
10 Halloween crafts and activities for kids
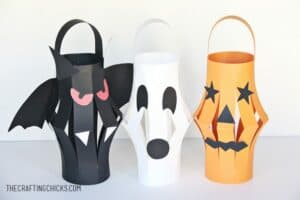
Halloween parties or any other time are perfect times for making Halloween paper lanterns for kids. These are the ideal Halloween decorations. We are so happy to share with you one of the most creative Halloween activities for kids! These Halloween paper lanterns are a great craft project for kids. For Halloween parties, they are perfect.
Materials:
- 8 1/2×11 inch paper in orange, black or white
- A stapler
- Gluesticks
- Ruler
- Scissors
Instructions:
Fold a piece of paper hotdog-style (lengthwise) to create the lantern. Start drawing lines with a ruler on the folded edge, spacing them about an inch apart. Make careful to leave a 1/2 inch gap towards the neighboring edge.
Now, using scissors, cut the lines beginning at the fold. Make sure to stop a half-inch from the edge. Unfold one end, then wrap it around. The lantern’s top and bottom should be stapled. This will be a hit with your kids! Give your Halloween creature faces by using paper shapes that you have cut out.
For making a ghost, cut out black eyes and a big circle mouth. For making a bat, add white fangs, creepy red eyes, pointed ears and wings to the back. Try making a black cat or black spider too! For making jack o’ lantern, cut out black eyes, nose and mouth.
Halloween Paper Lanterns from Crafting Chicks
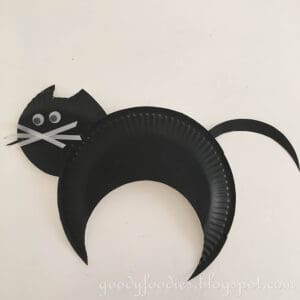
Black cats are adorable additions to your Halloween decorations at home. They are meant to bring good luck this Halloween. This is one of the Halloween coloring and craft games for kids will mimic a real black cat and add a touch of cuteness to your home during this spooky season.
Materials:
- Paper plate (X1)
- Black Paint/ black art paper
- Glue/ double-sided tape
- Scissors
- Craft eye/googly eye (X2)
- Art Paper (White)
Instructions:
Use black paint to hand-paint a black paper plate, or use black art paper to cut out a sizable circle. Cut a small circle off the plate, then from the smaller circle, a circular strip that will serve as the head and tail. Attach the smaller circle to the body, then stick the eyes and whiskers (you can use white art paper that has been cut into long strips for this). Attach the tail. Cut the ears from the head with scissors.
Paper Black Cat from Goody Foodies
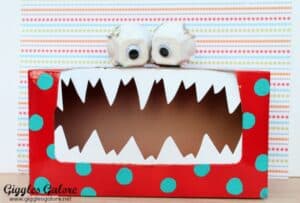
This fun and educational free Halloween craft game for kids is sure to set your spooky decorations on fire! These tiny tattle monsters made out of tissue paper boxes are easy, simple and creative. Ask your kids to put little notes in the tattle monster box and talk to the cute monster. It’s always there to listen to them
Materials:
- Empty tissue paper box
- Paints
- White craft foam
- Egg carton box
- Googly eyes
- Hot glue gun (Parents please help your kids with it)
- Scissors
Instructions:
Take an empty tissue paper box and paint it completely. Add polka dots or any other patterns your kids like. While the paint is drying out, draw some teeth on white craft foam and cut them out. Next, we have to get the eyes ready.
Use egg cartons and glue googly eyes on them. Now let’s bring our tattle monster to life. Use a hot glue gun and glue the eyes and teeth on the box. And booyah! Tattle monster is ready to do the talking!
Scary Monster Tissue Boxes from Giggle Galore
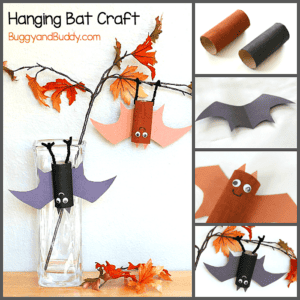
Oh, don’t worry! We haven’t forgotten about bats. To make the season of Halloween spookier, let’s make some Hanging Bats that will hang around in your house to make this season spooktacular. A simple DIY for kids to make a hanging bat out of used toilet paper rolls. Kids can help decorate for Halloween or fall with the help of these adorable cardboard tube bats.
Materials:
- Cardboard Tube (Kitchen roll tube)
- Black or brown paint and paintbrush
- Art paper (black or brown)
- Black pipe cleaners
- Scissors
- Single hole punch
- Glue
- Googly eyes
- Marker (Black/Silver Sharpies will do)
Instructions:
Depending on the color of the bat your kids choose to make, paint the cardboard tube either black or brown. Draw some bat wings on the art paper, then cut them out as the cardboard tube dries. Attach the wings to the cardboard tube’s back using glue. To create the ears, cut out a few triangles from the art paper.
Add some googly eyes and glue these to the bat. Make a mouth using a marker. Make two holes in the cardboard tube’s bottom. The legs will start from here. Half a black pipe cleaner should be used. Each pipe cleaner should be twisted through a hole that has been punched. Snip off the last inch of each leg to create the feet. One inch of pipe cleaner should be wrapped around the bottom of each leg. To create a hook for hanging, fold the middle part of the foot.
Your hanging bat for Halloween is ready!
Hanging Bat from Buggy and Buddy
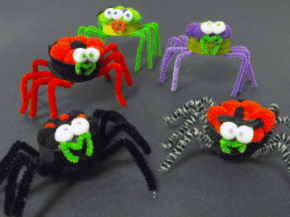
Are you ready to add some eight-legged spookiness to your Halloween crafting? Look no further than our “Bottle Cap Spiders” activity! This simple and fun craft is perfect for kids and will have them creating their own mini arachnid friends in no time. Let’s gather the materials and dive right into this spooky adventure.
Materials:
- Milk bottle caps (cleaned and dried)
- Pom-poms (for the spider’s body)
- Pipe cleaners (for the spider’s legs)
- Googly eyes
- Acrylic paints and paintbrushes
- Glue (craft glue or a hot glue gun with adult supervision)
- Scissors
- Optional: tiny bows, stickers, or other decorative items for customization
Instructions:
To create your own Bottle Cap Spider, start by painting the inside of a milk bottle cap with your choice of Halloween-inspired colors like orange, black, or green. Let your little artists’ imaginations run wild, even with shades of purple or red.
While the paint dries, take a pom-pom, traditionally black or dark gray, and attach it to the bottom of the bottle cap using glue. This pom-pom will be the spider’s body. Next, cut four pipe cleaners in half, creating eight pieces for the spider’s legs. Bend them slightly in the middle to form “knees” for a realistic look, keeping the ends straight for attachment.
Attach the legs by gluing them inside the bottle cap around the pom-pom body, allowing them to radiate outward like spider legs. Add googly eyes to the pom-pom head for personality and let the glue dry completely. For that extra touch, let your kids’ creativity shine by personalizing their spiders with tiny bows, stickers, or other decorations.
Once everything is securely attached and dried, you’ll have your very own adorable Bottle Cap Spider, perfect for Halloween decorations or playful additions to a spooky-themed setting.
Bottle Cap Spiders from Ruby Murray Musings
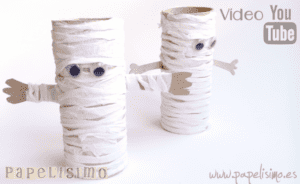
Looking for a quick and easy Halloween craft for kids? Toilet Paper Tube Mummies are a spooktacular choice! With just a few materials and simple steps, your little ones can create adorable mummy decorations to set the Halloween mood.
Materials:
- Two used cardboard rolls of toilet paper
- A piece of toilet paper
- Glue
- Scissors
- Googly eyes
Instructions:
Start by flattening one end of each toilet paper roll, making a straight edge. These will be the mummy’s base. Cut the toilet paper into strips. These will be used to wrap around the toilet paper rolls to create the mummy’s bandages.
Glue one end of a toilet paper strip to the flattened end of a roll. Wrap it around the roll, leaving some gaps to make it look like mummy bandages. Repeat this step until the roll is mostly covered. Glue two googly eyes onto the mummy’s bandaged head, peeping out from the gaps in the bandages.
Repeat steps 3 and 4 for the second roll. And that’s it! You’ve got yourself some adorable Toilet Paper Tube Mummies. These little mummies are not only cute but also a great way to repurpose toilet paper rolls and get into the Halloween spirit with your kids.
Toilet Paper Tube Mummies from Papelisimo
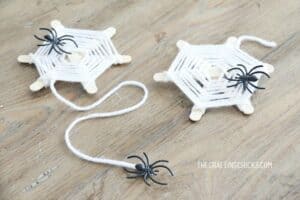
Halloween is creeping closer, and it’s time for some spooky crafting fun with the little ones. One fantastic activity to try is making Popsicle Stick Spider Webs. These are not only simple and fun but also perfect for enhancing fine motor skills. Here’s what you’ll need and how to create these creepy-crawly masterpieces:
Materials:
- 3 Popsicle sticks for each web
- Hot glue gun and hot glue
- About 2 yards of white yarn for each web
- Plastic spider rings
Instructions:
Start by forming a simple “+” shape with two Popsicle sticks and glue them together at the center to create a cross. This will serve as the base of your web. Now, take the third Popsicle stick and glue it diagonally across the cross, forming an “X” shape. This will be the framework of your spiderweb.
Once the glue has dried and the structure is stable, start wrapping the white yarn around the Popsicle stick framework. You can add a drop of glue at the beginning to secure the yarn, but be careful not to overdo it to avoid a sticky mess.
Continue wrapping the yarn around the framework in a circular pattern, radiating outwards until it looks like a spider web. Ensure that you leave some gaps in the web for that authentic spooky look. When you’re satisfied with your web’s design, cut the yarn, and secure the end with a small dot of glue.
Finally, attach a plastic spider ring to your web with a dab of hot glue, and your Popsicle Stick Spiderweb is ready to spook up your Halloween decorations! This craft is not only enjoyable but also helps kids develop their coordination and creativity. Plus, the plastic spider rings add a delightful touch of eerie realism. Have a blast crafting these Popsicle Stick Spiderwebs with your little ones this Halloween!
Popsicle Stick Spiderweb from The crafting chicks
Are you ready to get into the Halloween spirit with a bone-rattling craft? The Paper Plate Skeleton is a spooky-fun project that’s perfect for kids. Here’s what you’ll need and how to do it:
Materials:
- 10 to 15 paper plates (depending on the size you want)
- Scissors
- Marker & pencil
- Hole punch
- Twine or string
Instructions:
Start by drawing bone shapes on your paper plates. You’ll need bones for the skull, spine, ribcage, arms, and legs. Use a marker to make it easy to see the lines. Don’t worry about perfection – the spookier, the better! Cut out the bone shapes once you’ve drawn them.
Lay out all your bone pieces in the order they would go in a real skeleton. Use a pencil to mark where you’ll need to make holes for attaching the bones together. Remember, the head bone connects to the neck bone (and so on)!
Now, carefully punch holes where you marked with the pencil. Make sure the holes align so you can string twine through them. Thread twine through the holes to connect the bones, creating your paper plate skeleton.
Once your spooky skeleton is all put together, you can hang it up as a Halloween decoration. Find a good spot where it can swing and spook your Halloween guests! Enjoy crafting your Paper Plate Skeleton – it’s a fantastic way to get into the Halloween spirit and a fun project for kids of all ages!
Paper Plate Skeleton from Mom endeavors
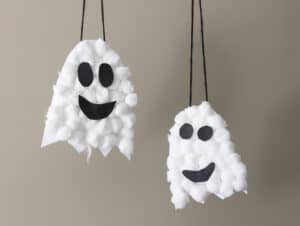
Are you ready to create an adorable and friendly ghost for Halloween? This craft is perfect for kids and super easy to make. This is one of the most simple Halloween activities for kids. Here’s all that you need:
Materials:
- White cardstock paper
- Scissors
- School glue
- Cotton balls
- Black art paper
- Yarn or string (optional)
Instructions:
Gather all your supplies. Lay out the white cardstock paper as your workspace.Cut a ghostly shape out of the white cardstock paper. It can be wavy, round, or any shape your child prefers. This is your ghost’s body.
Squeeze some school glue onto the cardstock ghost body, leaving space for the face. Now, press cotton balls onto the glue to make a fluffy cloud-like shape. Let it dry for a few minutes. Cut out spooky eyes and a mouth from the black art paper. Glue them onto the ghost’s face. You can make your ghost look happy, silly, or surprised – it’s up to you!
If you want your friendly ghost to hang, poke a small hole at the top and thread a piece of yarn or string through it. Tie a knot at the top, and now you can hang your ghost wherever you like! That’s it! Your Friendly Cotton Ball Ghost is ready to add a spooky yet friendly touch to your Halloween decorations. Enjoy making this craft with your little ones!
Friendly Cotton Ball Ghost from Thriving Home Blog
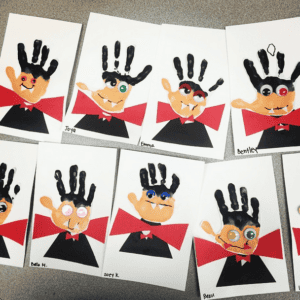
Get ready for a fangtastic and spooky Halloween craft that kids will love – the Handprint Vampire! This easy and creative activity is perfect for little ones who want to get into the Halloween spirit. With just a few materials, you can help your child transform their handprint into a friendly vampire that’s more cute than scary.
Materials:
- Washable paint (red and black)
- Googly eyes
- Red, white, and black paper
- Scissors
- Glue
Instructions:
Start by laying out your supplies on a craft table or a protected surface. Make sure your kids wear old clothes or an apron to avoid any paint mishaps. Pour some red washable paint onto a paper plate. Have your kids dip their hands into the paint and make a handprint on a piece of white paper. This will be the vampire’s face. Let it dry.
Once the handprint is dry, cut it out, leaving a little extra space around the fingers for the vampire’s hair.Now, cut out some sharp vampire teeth from white paper and glue them onto the palm area of the handprint. For the vampire’s eyes, use googly eyes or cut out small circles from white and black paper. Glue them above the teeth.
Cut thin strips of black paper for the vampire’s hair and glue them on top of the fingers.
Finally, add some red paint for the vampire’s cape or clothing. Allow it to dry, and your spooky Handprint Vampire is ready to haunt your Halloween decorations!
This Handprint Vampire craft is a fang-tastic way for kids to get into the Halloween spirit while creating a fun and friendly vampire character. It’s simple, creative, and a great addition to your Halloween decor!
Handprint Vampire from Crafty Morning
Celebrate Spooky Halloween Season with SKIDOS 👻🦇
With these 10 spooktacular Halloween crafts for kids, you’re all set for a month of creative and family-friendly Halloween fun in 2023. These activities are not only entertaining but also educational, encouraging fine motor skills, creativity, and imaginative play.
Along with such awesome ideas for Halloween activities for kids, we have a collection of Halloween themed games for kids. Your little ones can pick the plumpest of the pumpkins from the SKIDOS Superstore or dress up the characters in spooky costumes in SKIDOS Fantasy World. They can also bake some yummy treats for Halloween at the SKIDOS Bakery. We have many more such exciting Halloween puzzles and games for your kids to enjoy.
Your kids can enjoy some of our educational games with a Free SKIDOS Pass Trial. After the trial period, get a SKIDOS Pass to play 40+ educational games with a touch of Halloween enchantment. They will be prepared to enjoy fun and spooky fun this Halloween with 1000+ activities, 250+ educational videos, 25 online games (extra bonus), and more! Our adored team of experts to keep your kids interested and entertained.
Looking for more details about fun Halloween games and activities for your kids? For more information, see our YouTube channel and social media channels.
Happy Halloween! 🎃👻🍬